

How to Process your stacked image in Photoshop & Siril (Starnet method)
You have finished your astrophotography session and you have stacked your lights, darks, bias and flat frames. You now have a stacked linear image. In this step by step guide, we will stretch your linear image to reveal all its glory!
Want to process your image with just free software? Click here
Step 1 - Opening your stacked image in Siril for initial processing


-
Open Siril and load in your stacked image using the 'open' button. Then set your work directory by using the house shaped button. This is where your files will save.
-
Your file will open in Linear mode. In order to see what changes we are making, we want to view the file in 'Auto Stretch'. At the bottom of the image where it says linear, select auto stretch.
-
At the top of the image you will see the default viewing is RGB. You can also view your image from its individual channels, Red Green & Blue.
-
At the moment we have a poorly colour calibrated image with a very harsh green gradient. We will adjust this in step 2
Step 2 - Background extraction in Siril


-
Go to 'Image Processing' at the top of the window and select background extraction. Leave the sliders as the default values should be ok. You can play around with this.
-
Then select 'generate'
-
You will now have red squares over your image (Sample points). You want to make sure the sample points are covering the background of your image. Make sure the sample points are not on bright stars or nebulae/galaxies. You only want to extract the background.
-
When you are ready, select 'Compute background'
-
You can play around with the sample points and compute again if you are not happy.
-
Once you are happy with your extraction, select 'apply'
Our image is coming together already. Note that it is still in Auto stretch viewing mode, so do not worry if your image looks over stretched, we will make adjustments shortly.
Step 3 - Photometric Colour Calibration in Siril


Photometric colour calibration uses plate solving to accurately balance the colours in your image.
-
Go to 'Image processing' at the top of the window and select 'colour calibration', then select photometric colour calibration. A new window will pop up.
-
Enter the catalog name of your target and hit 'find'. In the results, double click your target.
-
Input the focal length of your lens/telescope and pixel size for your camera. If you do not know your pixel size, google it!
-
Hit ok and Siril will plate solve and automatically calibrate the colours in your image!
Step 4 - Initial stretch in Siril


Before we use starnett and photoshop, we are going to perform a small 'S' curve stretch using the Generalised Hyperbolic Stretch Transformation. (GHS)
-
Come out of 'Auto Stretch and return your image to 'linear'.
-
Go to 'Image Processing' in the top window and select ' Generalised Hyperbolic Stretch Transformation' A new window will pop up.
-
Here you will find a histogram and some sliders for adjustments.
-
Firs you want to zoom in to your histogram. (Around 100 times)
-
You now want to set your Symmetry point. The best way to do this is click into the centre of the histogram spike.
-
Using the 'stretch factor' slider, start stretching your data. Do not do too much for now and hit apply.
-
Amend your symmetry point and stretch again.
-
To avoid star bloating or clipping any highlights, you can use the highlight protection point slider.
-
You do not want to over stretch, just enough to see your target and some stars. A little bit like the image below.

Step 5 - Convert to 16 bit and save as tif


Make sure your file is converted to 16 bits and then save as a tif image.
You can now close down Siril.
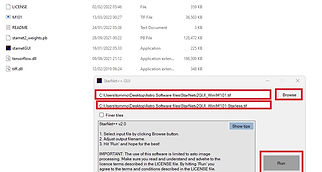
Step 6 - Creating a Starless image using Starnet


We are now going to create an additional starless image.
-
Locate the Starnett2 GUI folder you downloaded and paste your saved tif file in there.
-
Open the StarnetGUI application.
-
Browse for your tif file.
-
Underneath is how you would like to save your starless image. I would just add 'Starless' to the name
-
Hit run
-
You should now have 2 tif files. 1 original with stars. One starless.
Open both the stars and starless tif files into Photoshop

Step 7 - Creating a Star mask in photoshop


You should now have 2 tabs in photoshop, your image with stars and your image without stars. The reason why we have removed the stars from the image is so we can focus on stretching the main target, without overstretching a blowing out the stars. We will add the stars back in later.
-
Copy your Starless image and paste it as a layer in your stars image.
-
Using the blending mode just above your layers. Change the mode from 'normal' to subtract.
-
You should now have a image of just stars.
-
Use CTRL,SHIFT,ALT,'E' to merge the 2 layers into one new layer.

Step 8 - Background noise reduction


Backgrounds tend to be the nosiest. So lets remove some of that first.
-
If you image is washed out, reset your black point by going to 'image', 'adjustment' then 'levels'.
-
A new window will pop up. In order to bring your histogram to the left, use the left triangle below the histogram and slide it towards the histogram spike. Make sure you do not clip the data, there is no need to go too close at this stage.
-
For background noise reduction. first duplicate your layer. Go to 'Select' and 'Colour range'. A new window will pop up.
-
Change the selection to 'shadows' and play with the 'range' and 'fuzziness' sliders until you can only see your target and the background is white. Then hit 'ok'
-
With you selection, you want to create a mask. Click the small mask button beneath your layers.
-
Now you have masked the image, go to 'filter', 'blur', then 'gaussian blur'.
-
I would set the radius to about 1 pixel, but it will depend on your image.. Once done, hit ok.
-
You now have a Background noise removal layer.
-
CTRL,SHIFT,ALT,'E' to merge the layers underneath into a single layer.
Step 9 - Noise Reduction in Camera Raw


Lets reduce overall noise and slightly sharpen the image
-
Go to 'Filter' then 'Camera raw filter' A new window will pop up.
-
In this particular image. I pushed the 'highlights' tab and 'saturation' tab up a tiny bit. Then scrolled down to the 'details' tab.
-
Using the sliders, I slightly sharpened my image and bought in some noise reduction.
-
Once you are happy, hit 'ok'
-
CTRL,SHIFT,ALT,'E' to merge the layers underneath into a single layer.
Step 10 - Curves adjustment

You may want to bring your target out a little bit more. Use the curves adjustment to focus on which part of the histogram you want to stretch.
Go to 'Image', 'Adjustments' then 'Curves'
Step 11 - Saturation

You may want to saturate your target a bit more.
-
Click the colour tab underneath your layers and go to 'Hue/Saturation'
-
Then slide the saturation slider up. You do not want to oversaturate so be careful!
-
CTRL,SHIFT,ALT,'E' to merge the layers underneath into a single layer.
You may want to repeat some of the steps if you are not satisfied. perhaps your background is too saturated? use the same method as the background noise mask but instead of using blur, use camera raw filter to bring down the saturation.
Step 12 - Blending Starless with Stars

We are now going to bring the starless image into the stars image.
-
Select your merged starless layer and copy. (Ctrl C)
-
Go to your stars image a paste. (Ctrl V)
-
Using the blending mode just above your layers. Change the mode from 'normal' to either lighten or linear dodge. Depending on which one works better for your image
-
Now you are blended. Make some final adjustments in camera raw filter. (Noise reduction, saturation & sharpness)
-
Then crop down your image to remove any unwanted edges.
-
Adjust you black point to preference.
-
Orientate your image to preference. I chose to flip this image.
Final result below.
